
Get Lash-Ready with Less Mess: A Beginner’s Guide to Applying Fake Eyelashes
Hey there, beautiful! Are you looking to enhance your lashes with the help of fake eyelashes, but worried about the potential mess and frustration that comes with it? Fear not! As a seasoned fake lash wearer, I’m here to offer some expert advice on how to apply fake eyelashes with ease and precision, all while avoiding a sticky situation.
In this post, we’ll go over the basic steps for preparing to apply fake lashes, from choosing the right glue to getting your lashes clean and dry. Then, we’ll dive into the application process, discussing how to properly measure and place the lashes for a natural look. After that, we’ll add some finishing touches, including tips for using tweezers, eyeliner, and mascara to enhance the overall look. Finally, we’ll end with some key takeaways for avoiding messy glue and achieving a flawless application.
So, if you’re ready to elevate your lash game without any added stress, let’s get started!
Okay, let’s get into it! So, the first step in avoiding messy glue when applying fake eyelashes is preparation. This is super important because it sets the stage for how easily the lashes will go on and how natural they will look.
Preparation: How to Set Yourself Up for Success
First off, you need to choose the right glue. Not all eyelash glues are created equal, so be sure to read reviews and do your research before settling on one. Additionally, make sure that your eyelashes are clean and free of any residual makeup or oils. This will help the glue to adhere better and make for a smoother application.
If you’re like me, applying fake eyelashes can be stressful, so I find it helpful to have everything I need laid out and within reach. This includes my eyelash glue, a set of tweezers, my falsies, and a mirror. By having everything within reach, you’ll be able to work more efficiently and minimize the risk of getting glue all over the place.
Additionally, if your lashes have a curved band, consider bending them in the opposite direction to make them easier to apply. This can help them fit more snugly to your eyelid and look more natural.
Alright, you’re now prepped and ready to go! For a step-by-step guide on how to actually apply the lashes and avoid a gluey mess, head on over to https://besteyelashextensionsupplies.com/how-to-apply-fake-eyelashes-for-a-natural-look/. Happy lashing!
Applying those lash strips: beginner’s guide
Alright, we’re ready to put those lash strips on! First things first, make sure you measure the lashes against your eye before starting anything. Cut them accordingly, if necessary. Next, I like to place a small amount of glue on the eyelash strip, making sure not to use too much. Nothing messier than excess glue on those strips!
Once you’ve applied the glue, let sit for a few seconds to ensure that it’s tacky enough to stick well. Then, I apply the lash strip as close to the lash line as possible.
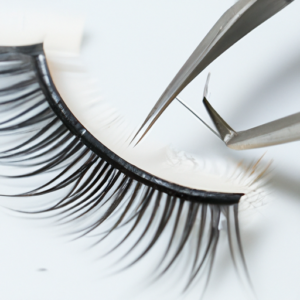
The tricky part is pressing down those corners of the lash to make sure they’re secure. That’s where tweezers come in handy! You can use them to apply some added pressure to the corners, without getting your fingers too close to the glue. That way, it dries well and will stay put all day.
If there’s any visible glue left over, simply use some eyeliner to cover it up. Voila! Your lashes are on and looking great! You can even add some mascara for added drama.
Remember, practice makes perfect. Keep trying different techniques and methods until you find one that works well for you. Don’t give up after the first try, and remember these tips to avoid messy glue and make your fake eyelashes look as real as possible!
Finishing Touches: Tweezing, Liner, and Mascara, Oh My!
Alright, we got the lashes on, but we’re not quite done yet. Let’s put those finishing touches on so we can confidently bat away.
First up, take a pair of tweezers and gently press down on both corners of the lash – you want to make sure it sticks properly all along the lash line. Then, grab your eyeliner and carefully fill in the area between your natural lash line and the fake lash. This will help to cover up any visible glue and create a seamless look.
Finally, apply mascara if desired – but wait until the glue is completely dry to avoid any smudging or clumping. Don’t forget to wiggle the mascara wand at the base of your lashes to create volume and curl. And voila – now you’re ready to show off your fabulous, fluttery lashes.
Wrap it up – Summary of steps to avoid goopy mess when sticking on fake lashes
Alright, we made it! You’ve got the glue, your lashes are clean, and it’s time to start making your eyes pop with those falsies. First, always measure the lashes so that they fit your eye, and add a small amount of glue. Don’t go overboard – a little goes a long way. Apply the lash to the lid, as close to your natural lash line as possible, and use tweezers to press down the corners. Once your lashes are in place, it’s time to finish with a bit of eyeliner to cover up any visible glue and add mascara for extra definition. With these steps, you’ll be fluttering your new lashes like a pro in no time. Just make sure to avoid any goopy mess by following these steps closely, and you’ll be winking at everyone in no time. So, give it a try and let your eyes do the talking!