
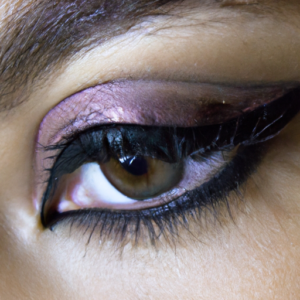
Hey there folks! Winged eyeliner is a classic look — with a single line extending out from the corner of your eye, it can give you an instantly put-together appearance. But to be honest, it’s not always the easiest thing to master. Well, I’m here to help make things easier. In this blog post, I’m diving into the basics of applying winged eyeliner for everyone from beginners to seasoned pros.
Tips for Applying Winged Eyeliner
Look, I’m no beauty pro, but after a lot of trial and error, I’ve pretty much perfected the art of getting a flawless cat eye. From prepping your skin to choosing the right tools, here’s my tried-and-true strategy for mastering the winged look!
Prep Your Skin: Before you do anything else, wash your face with a mild cleanser and moisturize with an oil-free lotion or serum. Moisturized skin will help the product go on smoothly, so don’t skip this important step!
Choose the Right Tools: When it comes to eyeliner, you have a few choices – liquid, gel, pencil, or even a felt tip marker. Each type has its own pros and cons, but if you’re going for a precise line, I’d recommend using a liquid liner with a long-wearing formula. Just be sure to pick one with a thin brush or felt nib that’ll give you ultimate control over your finished look.
Create the Wing: Once you have your tools together, start with a very thin line as close to your lash line as possible. Then simply extend the line at an angle away from the outer corner of your eye until you reach the desired length. You can always thicken it up later, so don’t worry about getting it perfect the first time around.
Fill in the Line: Finally, use short, light strokes to fill in the rest of your eye line. This will give your cat eye a polished finish and prevent any gaps from showing through. Don’t forget to clean up any mistakes with a damp cotton swab and then set the look with a clear mascara or brow wax.
Common Mistakes to Avoid When Applying Winged Eyeliner
When it comes to mastering the art of applying winged eyeliner, it can be easy to make a few rookie mistakes — but you don’t have to. To get those perfect wings every time, let’s take a look at some of the more common mistakes.
First off, it’s imperative that you prep your skin properly before you reach for your black liquid liner. Without a good foundation, you’re setting yourself up for disaster. Make sure that your skin is cleansed, moisturized, and primed.
Secondly, it’s important to use the right tools when attempting to create your cat eye. Nothing looks worse than an uneven line or smudged wing! Quality matters when it comes to eyeliner. Invest in a good felt tip liquid liner or kohl pencil specifically designed for that purpose.
Thirdly, when creating your wing shape, don’t go too bold with your first attempt. Start small and then, if desired, you can tweak it later. The key to a great wing is to keep the line as neat and precise as possible.
Perhaps one of the most common mistakes among wannabe winged eyeliner pros is overloading their brush or pencil with product. Too much liner on your brush or pencil will make it hard to maneuver with accuracy and precision. Less is more when it comes to making a perfect wing.
Most of all, remember that practice makes perfect when it comes to any kind of makeup application. Have fun, be creative, and don’t be afraid to make mistakes! Rome wasn’t built in a day, after all.
Conclusion: The Takeaway of Winged Eyeliner
If you want to beat the odds and rock out an eye-catching winged eyeliner, it’s key to take time and prep your skin, choose the right tools, and practice creating the wing. And that goes double for avoiding rookie mistakes like not prepping your face properly or using an unsharpened pencil to go in with too much product. Bottom line? Winged eyeliner looks chic and classic, but you’ll need to brush up on the basics if you want a fab finish.
Remember: winging out your eyeliner is all about focus and doing your due diligence. If you commit to that, you can create a look that stuns – no matter what else you choose to wear!
Winged Eyeliner Tips
Why is it so hard to do winged eyeliner?
I’ll tell you what, winged eyeliner can be tricky. But it doesn’t have to be.
The key is to start off slow and use the right tools. Invest in a quality eyeliner and give yourself plenty of time to practice. Make sure your hands, the area around your eyes, and the eyeliner are all clean before you start.
Then, take a breath, relax your eyes, and with a light hand, start drawing the line from your inner tear duct outward, following the curve of your eye. You don’t have to draw the line all the way to your temple. Start with a few short strokes and then work your way out and around. Make sure to get it as close to your lashes as possible, as this will give it a more natural look.
When you’re ready, start adding the flick, going slightly upwards toward the end of your eyebrow. You can use the curve of your lower lid as a guide. Finally, use a Q-tip dipped in a bit of makeup remover to correct and clean up any mistakes you might have made.
If you keep practicing and keep your hand steady, you’ll be rocking a flawless winged liner in no time.