I Tried a Lash Lift and Here’s What Happened!
Hey guys, it’s me, your friendly neighborhood beauty enthusiast. Today, I want to talk about my experience with a lash lift! In case you’re wondering, a lash lift is a beauty treatment that lifts and curls your natural lashes, giving them a more dramatic look without the use of extensions or mascara. It’s like a perm for your lashes, but without the chemicals that can damage your hair. Sounds pretty cool, right?
Before I dive into the details, I want to share a really helpful article I found about whether or not a lash lift is right for you. It’s important to figure out if this is the right treatment for your lashes before you commit, so definitely check it out here if you’re curious!
Gatherin’ My Tools: What I Need for a Lash Lift
Before gettin’ started on my client’s lash lift, I gotta make sure I got all the essential materials I need to get the job done right.
First things first, I need a lash lift kit. This kit usually includes perm solution, set solution, glue, and rods to give lashes that perfect lift. Make sure to get a kit that’s gentle on the eyes and made with quality ingredients to avoid any irritation or damage to the lashes.
Next, I need some cotton pads to help clean the lashes before applying the solutions. I use tweezers to separate and lift the lashes, making it easier to apply the adhesive and rods properly.
It’s always a good idea to double-check and make sure I got everything I need before starting a lash lift. Nothing’s worse than getting stuck midway through the process only to find out I’m missing a critical tool!
Prepare the Client: How to Get Your Client Ready for a Lash Lift
Before I start with the lash lift procedure, it is important to prepare the client’s eyes and lashes. This step is crucial to ensure that the client is comfortable during the procedure and to prevent any irritation or adverse reactions.
First, I cleanse the client’s eyes with a gentle cleanser. This step removes any dirt, oil, or makeup from the client’s lashes, which can affect the outcome of the lash lift. I use a cotton pad to apply the cleanser and gently wipe it across the client’s eyelids. I ensure that I cover the entire eyelid area, including the lash line.
After cleansing, I apply eye pads to protect the lower lashes and the skin around the eyes. These eye pads prevent the lashes from sticking together during the procedure and protect the client from any irritation.
Once the eye pads are in place, I instruct the client to keep their eyes closed throughout the procedure. This is to prevent any solution or adhesive from getting into the client’s eyes.
Preparing the client for a lash lift is a crucial step in ensuring that they have a comfortable and safe experience. Following these simple steps will help you perform a successful lash lift that your client will love.
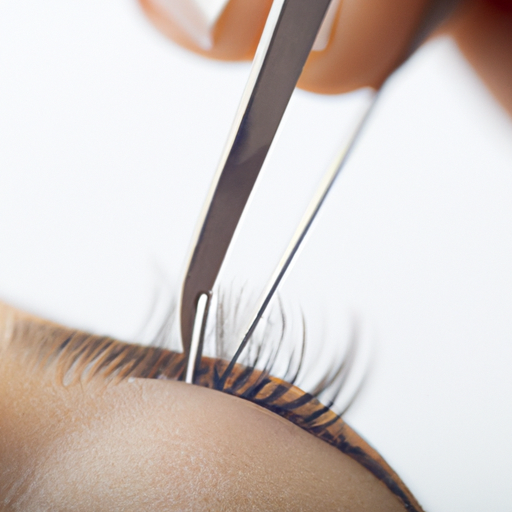
4. Apply Lash Lift Solution: Let’s Get Those Lashes Up and Curled!
Alright, it’s time to get to the nitty-gritty of the lash lift process – applying the solution. This is where the magic happens, and we get those lashes up and curled to perfection. Remember to have all the materials you gathered in the previous step to make the process go smoothly.First things first, we need to separate the lashes using a small applicator brush or a clean mascara wand. This will ensure that each lash is coated and lifted evenly. Then, we apply the adhesive to the back of the rods and attach them to the upper lash line, starting from the outside corner and working our way in. The lash rods come in different sizes, so choose the appropriate size for each client depending on their lash length and desired lift.Once the rods are attached, we can now apply the lift solution to each lash, making sure it’s saturated but not dripping. Be careful not to let any solution get on the skin as it can cause irritation. We leave the solution on for the recommended time according to the lash lift kit instructions.Pro tip: if the client has very fine or light-colored lashes, you can apply a second layer of solution to get a stronger lift. However, be cautious not to over-process the lashes.Overall, applying the lash lift solution is the most crucial step in the process, as it will determine the outcome of the lift. Take your time, and don’t rush through this step. Once you master the technique, your clients will be the envy of all their friends with beautifully lifted and curled lashes.
Ready, Set, Dry! Setting and Drying Your Lash Lift
Now the fun part begins! After applying the lash lift solution, it’s essential to set and dry your lashes correctly. This step is crucial in making sure that your lashes stay in place and achieve the perfect curl.
First, I blow-dry the lashes to help set the solution. This step may seem strange, but trust me, it works wonders! Using a gentle and cool air setting, I carefully point the dryer towards the lashes. Make sure you aren’t too close to the lashes, or the air may move the lashes around too much, undoing all your hard work.
After 5 – 10 minutes of blow-drying, the lashes should be set and porous. This is perfect for the final step, removing the lash lift solution. Gently remove the rods one by one, ensuring you don’t pull on any lashes in the process.
It’s essential to remember that everyone’s lashes are different, and some require longer to dry than others. If your lashes feel stiff and dry, you’ve gone too far. Be careful not to over-dry your lashes, or you’ll risk breakage.
Once you’ve removed all of the rods, take the opportunity to remove any leftover adhesive gently. Use an oil-based makeup remover or a micellar water on a cotton pad and carefully rub the adhesive off your lashes. Do not tug too hard, as you may pull out your eyelashes!
That’s it! Your lash lift is now complete, and you can admire your beautiful, lifted lashes. Don’t forget to follow up your lash lift with a nourishing oil to keep your lashes healthy and strong.
Removing the Lash Lift: Say Goodbye to Glamorous Lashes
Alright, ladies – it’s time to remove that fabulous lash lift. Don’t worry; it’s a straightforward process that won’t take you long. Just follow these easy steps:
Step 1: Remove the Rods
First, I grab my trusty tweezers and use them to carefully remove each of the rods. Start at one end and gently pull away from the eyelid. Repeat until all rods are removed from the lashes.
Step 2: Remove the Adhesive
Next, I use a cotton swab dipped in a gentle oil-based remover to dissolve the lash adhesive. Hold the cotton pad against the adhesive for a few seconds and then gently wipe it away. Be careful not to tug on the lashes.
Step 3: Cleanse the Eye Area
Finally, I cleanse the eye area with a mild cleanser to ensure that any remaining product is removed. I use a cotton pad soaked in water to gently wipe away any leftover lash lift solution or adhesive.
That’s it – you’re done! Your client’s lashes are now back to their natural state. Remember to always be gentle when removing a lash lift to avoid damage to the natural lashes. Happy lashing!
Give Your Lashes Some Love: Apply Nourishing Oil!
Alright, so you’ve successfully given your client a stunning lash lift but now it’s time for the cherry on top: the nourishing oil! Applying nourishing oil after a lash lift not only conditions the lashes but also enhances the overall look of the lift, leaving your client with luscious and healthy lashes that last longer.
Once the lift is complete, gently remove the eye pads and cleanse the lashes with a damp cotton pad to remove any remaining adhesive. Next, take a spoolie brush and apply a drop of nourishing oil to the lashes. Brush through from root to tip, making sure to coat each lash evenly.
But wait, before you send your client out the door, give them some pro tips for maintaining their new look. Advise them to avoid water, steam, and makeup for at least 24 hours post-lift to allow the lift to properly set. Additionally, they should avoid rubbing their eyes, tugging or pulling on their lashes, and sleeping on their face to avoid any accidental damage to their fresh lash lift.
Now, sit back and watch your client bat their beautiful nourished lashes with pride. And remember, a happy client is a returning client!
Finally, the Perfect Lash Lift!
Well done! You did it! You have just completed a lash lift. It might take some practice, but I promise it gets easier the more you do it. Always remember, practice makes perfect.
One of the most critical parts of the lash lift is the preparation. You have to make sure to cleanse the eyes thoroughly before applying any solutions. Also, don’t forget to attach the eye pads carefully to avoid any irritation to your client.
Another crucial point is the application of the adhesive. Remember to apply an appropriate amount of solution and attach the rods well. If you apply too much adhesive, you might end up with knotty, clumpy lashes, which is a no-no.
Blow-drying the lashes is also essential. Make sure to blow-dry the lashes for the required time. Don’t rush it, and you will get the perfect lift.
When removing the lash lift, do it carefully. Don’t pull or tug on the lashes, or you could cause them to break or fall out. Lastly, always apply a nourishing oil to the lashes after the treatment. This step will help them stay nourished and prevent damage.
In conclusion, when it comes to a lash lift, patience and practice are the keys to success. Follow these instructions, and you’ll be on your way to becoming a lash lift queen in no time. Happy lifting!